Sunday, January 29, 2012

Skeleton Keys ~ Lamp Redo


Whew!  Market's over and I'm finally catching my breath ~ a ton of fun but now on to the next thing.

I've missed spending time here and realized just how much I look forward to snapping pictures, sharing ideas and somehow trying to pull it all together with words ~ as clumsy as they sometimes may be.  Nevertheless, I've grown to appreciate just how much I enjoy landing here ~ it's a welcome reprieve from the norm.  Thank you for taking time to meet with me here.  


Today, I thought I would share a little something that's been on my mind for awhile.  This charming lamp came to me by way of my mom. You will notice in the photo above, the brown plastic cord is somewhat sad looking ~ I plan on changing it out to something a little more lady like soon.  


I noticed the glass collar right below the light bulb socket had 6 tiny holes around it.  At one time some crystals hung from the rim.


I had some crystals on hand that belonged to a light Nana once had.  I saved them hoping I would find a use for them some day.


I started to hang the crystals on the lamp ~ the obvious choice ~ but then remembered I had some old skeleton keys laying around... 


...and I thought "Why not?"


To attach the keys, I used wire and needle nose pliers...


...to form little hooks to hang the skeleton keys onto the lamp.  I cut lengths of wire and curled the ends with the pliers to form a knot on one end.  Next, I inserted the wire through the hole ~ knot side up and then bent the opposite end of the wire with the pliers to form a hook for each key to dangle from.  Then I slipped the keys onto each hook and crimped the wire tight with the pliers to keep them from slipping off.


Pretty cool ~ huh?!


Now on to the lampshade.  The ruffly shade which came with the lamp originally was a bit girly for my liking.   


I remembered another lampshade I had on hand and decided to give it a try.  I think the leather whipstitch around the top and bottom of this 1950's shade helps make the ruggedness of the skeleton keys work. 


The unexpected union of the skeleton keys with the more masculine lampshade create a quirky lighting option ~ and it was an easy DIY project.  I think it will be hanging around for awhile.  Thanks for stopping by Tattered Style!  XO
Saturday, January 21, 2012

Stash ~ Vintage Finds


 Amber Bottles and Pulleys

I've been working for the past week with Kelley, from The Hidden List, Gloria, from A Modern Glo and Lisa, from Cut and Paste, pulling together our space at the Dallas Gift Market's new venue,  Vintage FINDS.  We've come together as Stash ~ Vintage Finds to share our love of all things funky, industrial, old and vintage.  We're excited about this opportunity to share, showcase and sell our merchandise.  Although it's been a whirlwind week (there's barely even time to stop and eat) it's great working together with like minded people.  We've also had the chance to meet and make new friends along the way.  I wanted to share a few pics I snapped from our space ~ I hope you enjoy!


Medical Chart Cart


Letters!


Industrial Signage


 Wood Signage


 Industrial Compartment Stand, Hand Drills and Croquet Balls


Lisa's jazzed up magazine storage boxes ~ so creative! 

t
Numbers!


 Giant Pipe Cutter


Gavin's Ray Guns have also been attracting a lot of attention ~ see more of them here.


Buyer's have been amazed by his creativity with his art.  

Two days of Market down and two more to go!  I'll share my favorite find next time.  :)

Monday, January 16, 2012

Mock Shadow Box DIY + Hope & Love


Ever have one of those days where you feel particularly in need of some hope and love?  These two tiny, four letter words wield so much weight and power ~ don't they?  Recently, I had one of those kind of days and I remembered a gift my friend, Sharon, from Bless Your Neighbor, gave me.  The gift was two silver, flattened spoons with the words "hope" and "love" stamped on their surfaces.  The spoons were intended to be used as spreaders but after a day like I had, I decided I wanted them displayed somewhere prominently in my house as a symbol of encouragement.  *Sharon found the spoons here but if you don't live in the area, you can also find them here

Segue to the DIY project.  I decided to make a mock shadow box for the spoons.  This project is super simple ~ here's all you need to complete this easy DIYer:

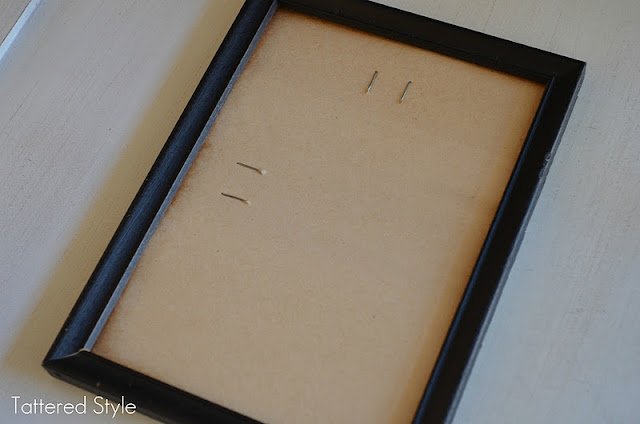
Picture Frames with Glass ~ I had a couple of old black 5 x 7 frames on hand.  If you don't have any spare frames laying around, I'm sure you can grab a couple for next to nothing at your local thrift store. 


I opted to use the cardboard backing of the frame as the matting background for the project (mainly because I liked the color and texture).  You could always add scrapbooking paper, newsprint, wallpaper, etc. underneath the glass ~ to suit whatever you might be showcasing. 


Silver Spoons ~ Or the item of your choice to display in your mock shadow box. 


Hot Glue Gun and Glue Sticks ~ I decided to adhere the spoons to the glass with hot glue.  If you want something more permanent you could always use E6000 or some other epoxy.  I personally like the hot glue because (knowing me) I may want to change them out someday.


I cleaned the glass and then applied a dab of hot glue on the back of each spoon at the top and bottom. Then I eyeballed the positioning of the spoon and pressed it into place.

 ~ Hope ~
 ~ Love ~

That's it ~ pretty easy, huh?  Here are my mock shadow boxes hanging close to the sink in the kitchen.  It's always nice to know you have hope and love hangin' around.  Hope you're feelin' the love today!

Monday, January 9, 2012

A Baby Shower


Fanciful touches were everywhere ~ hints that something special was soon to take place.  As I mentioned last week, a baby shower for my niece ~ Brittney ~ was in the making.  And there was no baby blue to be seen anywhere ~ Brittney's preference ~ vibrant colors for her baby boy.  Here are a few highlights from the days festivities.

Above, a number of baby cups ~ some mine, some my cousin Krissy's ~ with lime green blooms line the mantle.  Fresh flowers popped up everywhere ~ thanks to Krissy's (aka Birdie Pearl) handiwork ~ check out her blog here.
 

More of Krissy's talent ~ colorful ribbons draped on the chandelier above the table added a colorful and festive touch.


The inspiration for Brittney's cake came straight from the bedding she chose for the baby's crib.

via
A friend of mine ~ Wendy ~ a pastry chef created the beautiful and tasty cake.  It was truly a piece of art.  You can see more of Wendy's cake creations on her Facebook page here.  


A view of the table with some of the foodie items ~ I was pretty busy with the guests and the party and didn't take tons of pictures ~ oops, I'll do better next time.


The napkins were crafted from simple beverage napkins ~ stamped with a stamp that read, "welcome little one" on each corner of the napkins. 

In lieu of tablecloths, I opted to use brown builder's paper ~ an idea I borrowed from my friend Sharon, over at Bless Your Neighbor.  I decided I wanted to echo the bedding theme on the "tablecloths" by stamping cars and trucks on the edge of the paper to form a border (thanks Julie!).  This could easily be adapted and customized for your special event, simply by using the stamps and ink colors of your choice.


Pretty flowers in vivid colors topped almost every surface ~ here little blossoms are held in a sweet little cherub vase.  A flea market find for a dollar ~ a heavenly deal.  :)


Wendy also supplied us with plenty of vanilla scones and banana bread ~ not to mention yummy sausage balls as well.


My son's girlfriend, Michelle, graciously agreed to come over one evening and draw a puppy and snail on my old vintage chalk board for me.  Hugs Michelle!


A most appropriate rhyme compliments Michelle's handiwork.  Thank you Julie for owning the lettering task!  


Here's a helpful hint most any guest of honor will surely appreciate.  It really helps to simplify the process of sending out thank you notes.  *Note how the multi-colored m&m's worked perfectly into the color scheme of the shower.  The striped murano glass dish came from Venice.   


I also wanted Brittney to know how much she was loved with thoughts and sentiments from family and friends for her and baby.  On the table (above and below) again...covered with brown paper ~ I left a note and supplied markers, instructing the guests to write a note for Britt and baby.


After the shower was over, I rolled it up for Brittney to take home with her ~ for her to read and ponder over ~ at her leisure.


My beautiful niece ~ Brittney ~ enjoying one of her many gifts.  Check out the sweet onesie above ~ baby clothes are so stinkin cute!  


Some of the family and friends ~


~ who came to celebrate with Brittney.

Brittney and me :)
I would be remiss if I didn't share the unfoldings of last week.  For several days our son had an onslaught of seizures and, needless to say, he became our primary focus.  It's during times like these, that I thank God for family and friends.  They certainly came to my rescue and helped out with Brittney's shower.  Thank you to Sharon, Julie, Jade, Wendy, Krissy, Kelley, Michelle, Gavin and Nat for being so wonderful.  You are all a blessing and I love you more than you can possibly know.

And as for Brittney ~ you are loved by so many ~ we anxiously await the birth of your sweet baby boy.  Thank you for letting us help celebrate your little miracle with you.  XO

Monday, January 2, 2012

Baby Shower ~ Tattered Style with a Twist


I'm busy gearing up for a baby shower that I'm hosting this weekend, for my niece, Brittney.  While I do believe Brittney has an appreciation and a keen eye for vintage things, she doesn't quite have the same affection for the not-so-perfect as I do.  My challenge for the shower, is to create something special for the guest of honor and her baby boy ~  maybe tattered style with a twist.  I'm still working on some of the details, but one thing I know for sure is my collection of baby cups, some from my own family and some vintage ~ will be making their debut.   


Every now and then, I pick up these one-of-a-kind cups at antique stores, flea markets or thrift stores.  The delicate silver plated cup above was a Canton find ~ a real steal for a dollar.  


One that is particularly special to me is this porcelain cup that belonged to my husband when he was a baby.  My mother-in-law gave it to me as a gift when our first son was born.  Also, in my collection, are my own three son's baby cups. 


~ Reagan's ~


~ Corbin's ~


~ Gavin's ~


Another favorite of mine ~ this unique pewter cup.  Notice the embossed choo-choo train in the background with the words chew-chew imprinted on top.

That's all I'll be sharing today ~ I don't want to give away too much detail about the shower and spoil the surprises for my niece.  I'll be sure to share photos of this special Tattered Style event soon.  Have a good week.  :)

P.S.  I'd love for you to follow me on Facebook or Pinterest.  
Related Posts Plugin for WordPress, Blogger...